Chapter 7
Firecraft
SITE SELECTION AND PREPARATION
7-3. You will have to decide what site and arrangement to use. Before building a fire consider—
-
The area (terrain and climate) in which you are operating.
-
The materials and tools available.
-
Time; how much time do you have?
-
Need; why do you need a fire?
-
Security; how close is the enemy?
7-4. Look for a dry spot that—
-
Is protected from the wind.
-
Is suitably placed in relation to your shelter (if any).
-
Will concentrate the heat in the direction you desire.
-
Has a supply of wood or other fuel available. (Figure 7-4 lists types of material you can use.)
7-5. If you are in a wooded or brush-covered area, clear the brush and scrape the surface soil from the spot you have selected. Clear a circle at least 1 meter (3 feet) in diameter so there is little chance of the fire spreading.
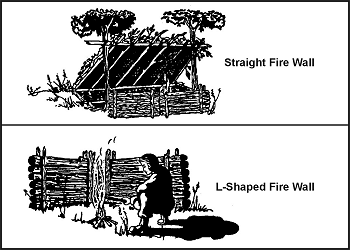
7-6. If time allows, construct a fire wall using logs or rocks. This wall will help to reflect or direct the heat where you want it (Figure 7-1). It will also reduce flying sparks and cut down on the amount of wind blowing into the fire. However, you will need enough wind to keep the fire burning.
|
CAUTION Do not use wet or porous rocks as they may explode when heated. |
Figure 7-1. Types of Fire Walls
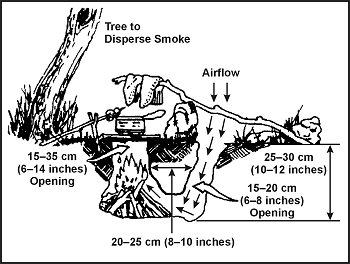
7-7. In some situations, you may find that an underground fireplace will best meet your needs. It conceals the fire and serves well for cooking food. To make an underground fireplace or Dakota fire hole (Figure 7-2)—
-
Dig a hole in the ground.
-
On the upwind side of this hole, poke or dig a large connecting hole for ventilation.
-
Build your fire in the hole as illustrated.
Figure 7-2. Dakota Fire Hole
7-8. If you are in a snow-covered area, use green logs to make a dry base for your fire (Figure 7-3). Trees with wrist-sized trunks are easily broken in extreme cold. Cut or break several green logs and lay them side by side on top of the snow. Add one or two more layers. Lay the top layer of logs opposite those below it.
Figure 7-3. Base for Fire in Snow-covered Area
previous | next
All text and images from the U.S. Army Field Manual 3-05.70: Survival.
Appearance of the materials from the U.S. Army Field Manual here does not constitute or represent endorsement by probablyhelpful.com.
ProbablyHelpful.com is not responsible for inaccurate or outdated information provided by the U.S. Army Field Manual 3-05.70.


