Chapter 4
Basic Survival Medicine
LIFESAVING STEPS
4-37. Control panic, both your own and the victim's. Reassure him and try to keep him quiet. Perform a rapid physical exam. Look for the cause of the injury and follow the ABCs of first aid. Start with the airway and breathing, but be discerning. In some cases, a person may die from arterial bleeding more quickly than from an airway obstruction. The following paragraphs describe how to treat airway, bleeding, and shock emergencies.
OPEN AIRWAY AND MAINTAIN
4-38. You can open an airway and maintain it by using the following steps:
-
Step 1. You should check to see if the victim has a partial or complete airway obstruction. If he can cough or speak, allow him to clear the obstruction naturally. Stand by, reassure the victim, and be ready to clear his airway and perform mouth-to-mouth resuscitation should he become unconscious. If his airway is completely obstructed, administer abdominal thrusts until the obstruction is cleared.
-
Step 2. Using a finger, quickly sweep the victim's mouth clear of any foreign objects, broken teeth, dentures, and sand.
-
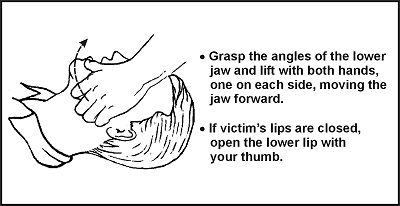
Step 3. Using the jaw thrust method, grasp the angles of the victim's lower jaw and lift with both hands, one on each side, moving the jaw forward. For stability, rest your elbows on the surface on which the victim is lying. If his lips are closed, gently open the lower lip with your thumb (Figure 4-1).
Figure 4-1. Jaw Thrust Method
-
Step 4. With the victim's airway open, pinch his nose closed with your thumb and forefinger and blow two complete breaths into his lungs. Allow the lungs to deflate after the second inflation and perform the following:
-
Look for his chest to rise and fall.
-
Listen for escaping air during exhalation.
-
Feel for flow of air on your cheek.
-
-
Step 5. If the forced breaths do not stimulate spontaneous breathing, maintain the victim's breathing by performing mouth-to-mouth resuscitation.
-
Step 6. There is danger of the victim vomiting during mouth-to-mouth resuscitation. Check the victim's mouth periodically for vomit and clear as needed.
NOTE: Cardiopulmonary resuscitation (CPR) may be necessary after cleaning the airway, but only after major bleeding is under control. See FM 21-20, Physical Fitness Training, the American Heart Association manual, the Red Cross manual, or most other first aid books for detailed instructions on CPR.
CONTROL BLEEDING
4-39. In a survival situation, you must control serious bleeding immediately because replacement fluids normally are not available and the victim can die within a matter of minutes. External bleeding falls into the following classifications (according to its source):
-
Arterial. Blood vessels called arteries carry blood away from the heart and through the body. A cut artery issues bright red blood from the wound in distinct spurts or pulses that correspond to the rhythm of the heartbeat. Because the blood in the arteries is under high pressure, an individual can lose a large volume of blood in a short period when damage to an artery of significant size occurs. Therefore, arterial bleeding is the most serious type of bleeding. If not controlled promptly, it can be fatal.
-
Venous. Venous blood is blood that is returning to the heart through blood vessels called veins. A steady flow of dark red, maroon, or bluish blood characterizes bleeding from a vein. You can usually control venous bleeding more easily than arterial bleeding.
-
Capillary. The capillaries are the extremely small vessels that connect the arteries with the veins. Capillary bleeding most commonly occurs in minor cuts and scrapes. This type of bleeding is not difficult to control.
4-40. You can control external bleeding by direct pressure, indirect (pressure points) pressure, elevation, digital ligation, or tourniquet. Each method is explained below.
Direct Pressure
4-41. The most effective way to control external bleeding is by applying pressure directly over the wound. This pressure must not only be firm enough to stop the bleeding, but it must also be maintained long enough to "seal off" the damaged surface.
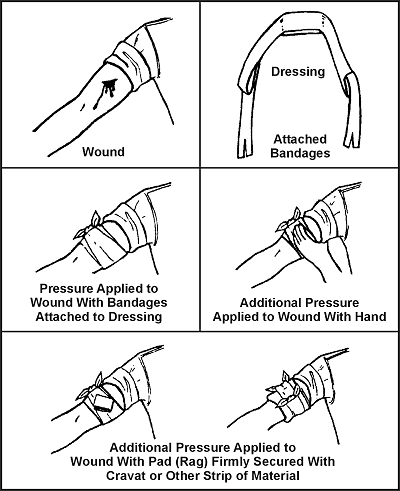
4-42. If bleeding continues after having applied direct pressure for 30 minutes, apply a pressure dressing. This dressing consists of a thick dressing of gauze or other suitable material applied directly over the wound and held in place with a tightly wrapped bandage (Figure 4-2). It should be tighter than an ordinary compression bandage but not so tight that it impairs circulation to the rest of the limb. Once you apply the dressing, do not remove it, even when the dressing becomes blood soaked.
Figure 4-2. Application of a Pressure Dressing
4-43. Leave the pressure dressing in place for 1 or 2 days, after which you can remove and replace it with a smaller dressing. In the long-term survival environment, make fresh, daily dressing changes and inspect for signs of infection.
Elevation
4-44. Raising an injured extremity as high as possible above the heart's level slows blood loss by aiding the return of blood to the heart and lowering the blood pressure at the wound. However, elevation alone will not control bleeding entirely; you must also apply direct pressure over the wound. When treating a snakebite, be sure to keep the extremity lower than the heart.
Pressure Points
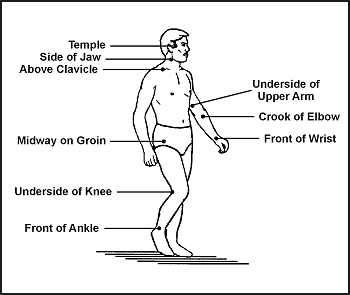
4-45. A pressure point is a location where the main artery to the wound lies near the surface of the skin or where the artery passes directly over a bony prominence (Figure 4-3). You can use digital pressure on a pressure point to slow arterial bleeding until the application of a pressure dressing. Pressure point control is not as effective for controlling bleeding as direct pressure exerted on the wound. It is rare when a single major compressible artery supplies a damaged vessel.
Figure 4-3. Pressure Points
4-46. If you cannot remember the exact location of the pressure points, follow this rule: Apply pressure at the end of the joint just above the injured area. On hands, feet, and head, this will be the wrist, ankle, and neck, respectively.
|
WARNING Use caution when applying pressure to the neck. Too much pressure for too long may cause unconsciousness or death. Never place a tourniquet around the neck. |
4-47. Maintain pressure points by placing a round stick in the joint, bending the joint over the stick, and then keeping it tightly bent by lashing. By using this method to maintain pressure, it frees your hands to work in other areas.
Digital Ligation
4-48. You can stop major bleeding immediately or slow it down by applying pressure with a finger or two on the bleeding end of the vein or artery. Maintain the pressure until the bleeding stops or slows down enough to apply a pressure bandage, elevation, and so forth.
Tourniquet
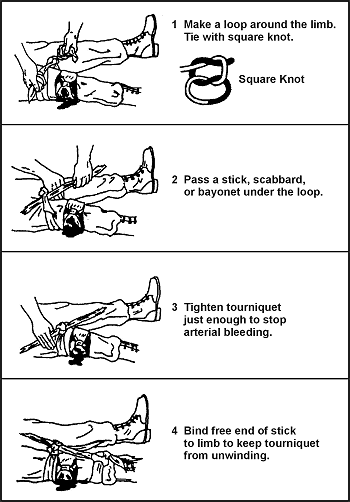
4-49. Use a tourniquet only when direct pressure over the bleeding point and all other methods did not control the bleeding. If you leave a tourniquet in place too long, the damage to the tissues can progress to gangrene, with a loss of the limb later. An improperly applied tourniquet can also cause permanent damage to nerves and other tissues at the site of the constriction. If you must use a tourniquet, place it around the extremity, between the wound and the heart, 5 to 10 centimeters (2 to 4 inches) above the wound site. Never place it directly over the wound or a fracture. Figure 4-4 explains how to apply a tourniquet.
Figure 4-4. Application of Tourniquet
4-50. After you secure the tourniquet, clean and bandage the wound. A lone survivor does not remove or release an applied tourniquet. However, in a buddy system, the buddy can release the tourniquet pressure every 10 to 15 minutes for 1 or 2 minutes to let blood flow to the rest of the extremity to prevent limb loss.
PREVENT AND TREAT SHOCK
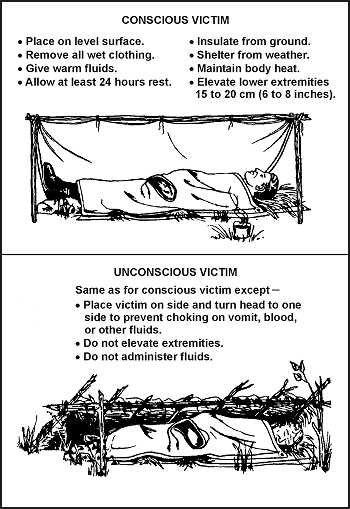
4-51. Anticipate shock in all injured personnel. Treat all injured persons as follows, regardless of what symptoms appear (Figure 4-5):
-
If the victim is conscious, place him on a level surface with the lower extremities elevated 15 to 20 centimeters (6 to 8 inches).
-
If the victim is unconscious, place him on his side or abdomen with his head turned to one side to prevent choking on vomit, blood, or other fluids.
-
If you are unsure of the best position, place the victim perfectly flat. Once the victim is in a shock position, do not move him.
-
Maintain body heat by insulating the victim from the surroundings and, in some instances, applying external heat.
-
If wet, remove all the victim's wet clothing as soon as possible and replace with dry clothing.
-
Improvise a shelter to insulate the victim from the weather.
-
Use warm liquids or foods, a prewarmed sleeping bag, another person, warmed water in canteens, hot rocks wrapped in clothing, or fires on either side of the victim to provide external warmth.
-
If the victim is conscious, slowly administer small doses of a warm salt or sugar solution, if available.
-
If the victim is unconscious or has abdominal wounds, do not give fluids by mouth.
-
Have the victim rest for at least 24 hours.
-
If you are a lone survivor, lie in a depression in the ground, behind a tree, or any other place out of the weather, with your head lower than your feet.
-
If you are with a buddy, reassess your patient constantly.
Figure 4-5. Treatment for Shock
previous | next
All text and images from the U.S. Army Field Manual 3-05.70: Survival.
Appearance of the materials from the U.S. Army Field Manual here does not constitute or represent endorsement by probablyhelpful.com.
ProbablyHelpful.com is not responsible for inaccurate or outdated information provided by the U.S. Army Field Manual 3-05.70.

